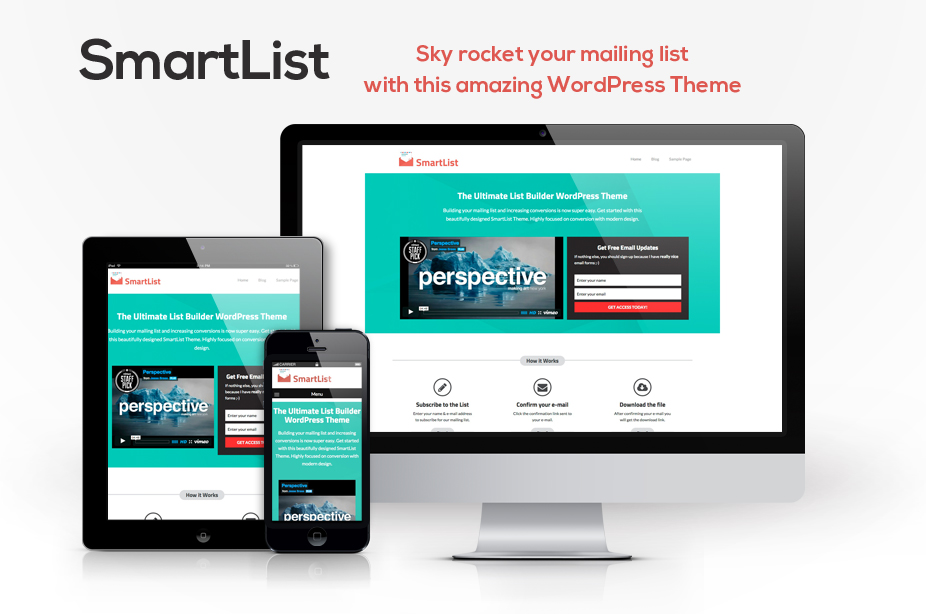
SmartList is a mobile responsive WordPress theme designed for online marketers to increase conversion rates and email signups.
This theme has unique styling focused on sky rocket your mailing list. The main features of SmartList WordPress theme are:
- Unlimited Color Schemes.
- Custom Branding.
- Layout and Google Font options.
- Build trust with user testimonial.
For more features of SmartList WordPress theme, click here.
Installing SmartList Theme
First you need to purchase SmartList theme. After purchasing the theme upload the .zip file and install the theme. For more details check out our previous post on how to install theme on WordPress.
When you install the theme, it is loaded with the sample content and your site exactly looks like a Demo site. Activate the theme.
Setting a Static Front Page
SmartList uses Static Front page option for displaying the content and widgets of home page of your site.
- Go to Pages >> Add New. Create “Home” Page and publish it.
- Create another page “Blog” and publish it.
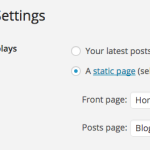
- Go to Settings >> Reading panel.
- Set Front page displays to a static page.
- Select Home front page and Blog as posts page and save the changes.

Customizing SmartList
Once you setup the static front page, you can use Theme Customizer to update content and styling easily.
Amber comes with unique live customization feature which makes it easy to setup the content.
Setting up Site title, tagline and Header image
Enter the title and tagline of site that suits your business identity or add logo of your business in Header image section.
Setting up Theme layout and Google Fonts
SmartList has two layout options: Boxed and Full Width. Select the layout that perfectly suits your website. Select the font of your text which is suitable for your website under Google .
Setting up Color Scheme
SmartList comes with unlimited color options. Select any color from color picker that suits your business identity.
Setting up Home Featured Headline
If you selected boxed layout then you can add background image.
Enter the title and description that describes your business in perfect words.
Setting up Home Featured Left and Right
- Enter the text or HTML tags in the Home Featured Left section to add anything on the left section of home page like video, text etc.
- Enter the HTML tags or text in Home Featured Right section to add any thing like e-mail subscription form etc.
Setting up Home Featured Mid settings
- Enter the Featured Title under Home Featured Mid settings.
- Enter the Icon code under Mid Featured # section. Here you’ll have to add Font Awesome icon.
- Enter the Title, description, link text and link URL.
SmartList allows you to add 3 section to display your services on the home page.
Setting up Featured List Section
- Enter the section title and description.
- Enter features of your product on the home page. You can add at least 5 features.
- Enter the shortcode of slider you created with any slider plugin under Featured middle right section.
Setting up Testimonial settings
- Enter the testimonial title.
- Select the image of customer and add the description given by the corresponding customer.
- Enter the client name and URL.
SmartList allows you to add 3 testimonials on the home page of the website.
Setting up CTA
- Select one option to display CTA on Front page, All pages or None.
- Add text that provokes your customer.
- Select CTA button background and button text color from the color picker.
- Enter link text and link URL to redirect your customers.
Setting up Blog Settings
Enter the title and description that describes your blog. It will display on the blog page of your website.
Setting up Sidebar Footer widget and Footer text
- Add the widget that you want to display on the sidebar.
- Enter the copyright text in the Footer text section.
- SmartList has three column Footer Widget area. Select the widget you want to display at the footer section.
Once you’re done click on Save and Publish Button.
If you’ve got any queries related to theme or above article, feel free to ask via our support forum or comment section below.
More interesting articles
 How To Setup Webify WordPress Theme
 How To: Setup An Online Store With SmartShop Pro WordPress Theme
- How To: Setup An Online Store With Amber WordPress Theme
- How To Setup A Website With Prism WordPress Theme
- How To Create A Business Website With WordPress - Superb Theme
- How To Build A Girlish Website With Garnish WordPress Theme
Muawia says:
I just want to ask about the speed loading this theme is it very quick light weight ?
Thanks for your answer