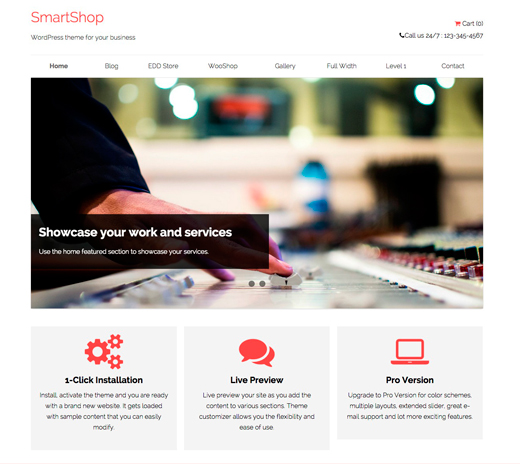
SmartShop is a mobile responsive and versatile WordPress theme for building an engaging and sophisticated online store in WordPress.
SmartShop comes with built in support for WooCommerce and Easy Digital Downloads plugins. This theme is complete suite for your online and offline business.
Features of SmartShop Lite
- Unlimited Color schemes.
- Styling and support for WooCommerce and EDD.
- Multiple layout options.
- Styling for Contact Form 7, Soliloquy Lite and Envira Gallery Lite.
You can see full feature list of SmartShop Lite theme here.
Install and activate SmartShop Lite
Since SmartShop Lite is a free theme, you can download .zip file from wordpress.org. You can also check our previous WordPress guide on how to install and activate theme on WordPress.
Installing Required Plugins
When you activate the theme you will see the the following message on your dashboard:
- Click on Begin Installing plugins.
- You’ll see redirect to the page where you will see the list of all the recommended plugins (Contact Form 7, Soliloquy Lite and Envira Gallery Lite).
- Install and activate the recommended plugins.
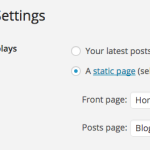
Setting a Static Front Page
SmartShop Lite uses Static Front page option for displaying the content and widgets of home page of your site.
- Go to Pages >> Add New. Create “Home” Page and publish it.
- Create another page “Blog” and publish it.
- Go to Settings >> Reading panel.
- Set Front page displays to a static page.
- Select Home front page and Blog as posts page and save the changes.

Customize SmartShop Lite
The theme adapts unique live customization feature which makes the customization process super easy. You can see all the changes made in real time.
Setting up Site title, tagline and Header image
Enter the title and tagline of site that suits your business identity or add logo of your business in Header image section.
You can also select header color from the color picker.
Setting up Theme layout, Color and Background Settings
Select any layout from the given two options: Boxed or Full width. You can also add background image if you will select Boxed layout.
There are wide range of color options available. Select the color from color picker that suits your business identity.
Setting up Front Page featured posts
- Enter the Title and number of posts to display on the home page of your website.
- Select the category to display posts category wise (optional).
- Enter posts Read more link text.
Products on Front page
This option is used to display WooCommerce products on the home page of your website.
- Simply activate the WooCommerce plugin.
- Enter the title, number of products, featured product description (if you want to) like above screenshot.
Easy Digital Downloads
To display digital products (or products of EDD plugin), you will use this section.
You’ll see this section when EDD plugin is activated on your website.
- Enter the number of products, Featured products title and description.
Note: If you deactivate EDD plugin, this section will disappear from your customizer.
Customizing Widgets
Header Widget
The widget added in this section will appear in the top right section of the header.
- Click on Add widget button to enter a widget.
- Add HTML tags or simple text you want to display in the right section of the header.
Home Featured
This section will appear below the navigation on the front page. This section is mainly for showcasing featured images in the slider.
- Click on Add widget button to enter a Text widget.
- Enter the slider shortcode and slider will display on the front page.
Note: It is recommended to create slider using Soliloquy Lite plugin.
Home CTA
- Click on Add widget button to enter a Text widget.
- Enter the HTML tags or plain text that provokes your customer.
Home Sidebar
This section display content at the right of featured posts. This section is mainly designed to display contact form.
- Click on Add widget button to enter a Text widget.
- Enter the shortcode of the contact form in the text widget or you can add any thing you want to add.
Home #
This section is mainly designed to showcase your services and products.
- Click on Add widget button to enter a Text widget.
- Enter HTML tags or simple text. You can also add Font Awesome icons as shown in above screenshot.
Note: This theme provides you sections to showcase your services.
Footer Widget
The three column Footer Widget content as in Demo site comes from the following steps:
- Add the widgets like Recent Comments etc. you want to display in Footer #1.
- Similarly add widgets in Footer #2 and #3
SmartShop Shop Page
To create a Shop page on your website, either WooCommerce or EDD plugin is compulsorily installed on your website.
When you installed WooCommerce plugin, there is an option to install WooCommerce pages. Click there and install all the pages.
When you installed EDD plugin, you have to select the template on the page where you want to display the products. As you can see in above screenshot, we select template store on Shop page.
This will select EDD shop page on your website. To select WooCommerce shop page, you only need to activate the plugin. There is no need to select the template.
When you’re done with all the settings, click on Save and Publish button.
If you’ve got any queries related to theme or this tutorial, feel free to ask via support page or comment section below.
More interesting articles
 How To Setup Webify WordPress Theme
 How To: Setup An Online Store With SmartShop Pro WordPress Theme
- How To Setup A Business Website With Tatva WordPress Theme
- How To: Setup A Website To Boost E-mail Signups With SmartList WordPress Theme
 Webify - Free, Responsive, WooCommerce Ready WordPress Theme
- Making A WordPress Mobile Website With WPtouch